
JMP
- Draws a jump line.
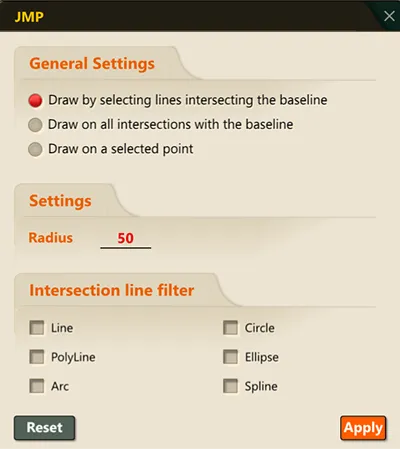
- Running the command and entering the Setup (S) keyword opens the command options popup window. In this popup window, you can configure the command’s behavior options.
- Clicking the “Reset” button resets the command options to their default values.

- You can configure the option values in the popup window before drawing the jump line.
1. Draw a Jump Line by Selecting Lines That Cross the Base Line Demo Video
Section titled “1. Draw a Jump Line by Selecting Lines That Cross the Base Line Demo Video”1) Run the “JMP” command.
2) Select/enter the Setup (S) keyword.
3) In the Default Settings of the command options popup window, click “Draw by selecting lines intersecting the baseline.”
4) Click the “OK” button to save the setting.
5) Select the base line for the jump line. (Only lines, arcs, polylines, and splines can be selected.)
6) Select the objects to reference for the jump line. (Based on the crossing line filter in the option values.)
7) Set the convex direction.
8) Press the ESC key to end the command.
2. Draw Jump Lines on All Lines That Cross the Base Line Demo Video
Section titled “2. Draw Jump Lines on All Lines That Cross the Base Line Demo Video”1) Run the “JMP” command.
2) Select/enter the Setup (S) keyword.
3) In the Default Settings of the command options popup window, click “Draw on all intersections with the baseline.”
4) Click the “OK” button to save the setting.
5) Select the base line for the jump line. (Only lines, arcs, polylines, and splines can be selected.)
6) Set the convex direction.
7) Press the ESC key to end the command.
3. Draw a Jump Line at a Selected Point Demo Video
Section titled “3. Draw a Jump Line at a Selected Point Demo Video”1) Run the “JMP” command.
2) Select/enter the Setup (S) keyword.
3) In the Default Settings of the command options popup window, click “Draw on a selected point.”
4) Click the “OK” button to save the setting.
5) Select the base line for the jump line. (Only lines, arcs, polylines, and splines can be selected.)
6) Select the insertion point for the jump line.
7) Set the convex direction.
8) Press the ESC key to end the command.